Workflows
The Workflows page shows the workflows configured in the system. Here you can manage workflows and monitor their activity.
A workflow can be started multiple times in response to one or more events at a given time. Each time the workflow execution starts, it is counted as a separate instance. A count icon displays the number of instances currently running. Hover the mouse over this icon to get more information.
To stop all running workflow instances, click the Stop Workflows link. This is only available when at least one workflow instance is running.
Workflow Designer
In the Workflow Designer, you configure what UIP should do when a workflow instance is started. For example, to which applications should it connect, in which order, and what data should it pass between these applications.
User Interface Overview
Creating, cloning or editing a workflow opens up the Workflow Designer. The Workflow Designer's user interface has a few main areas, highlighted in the picture below:
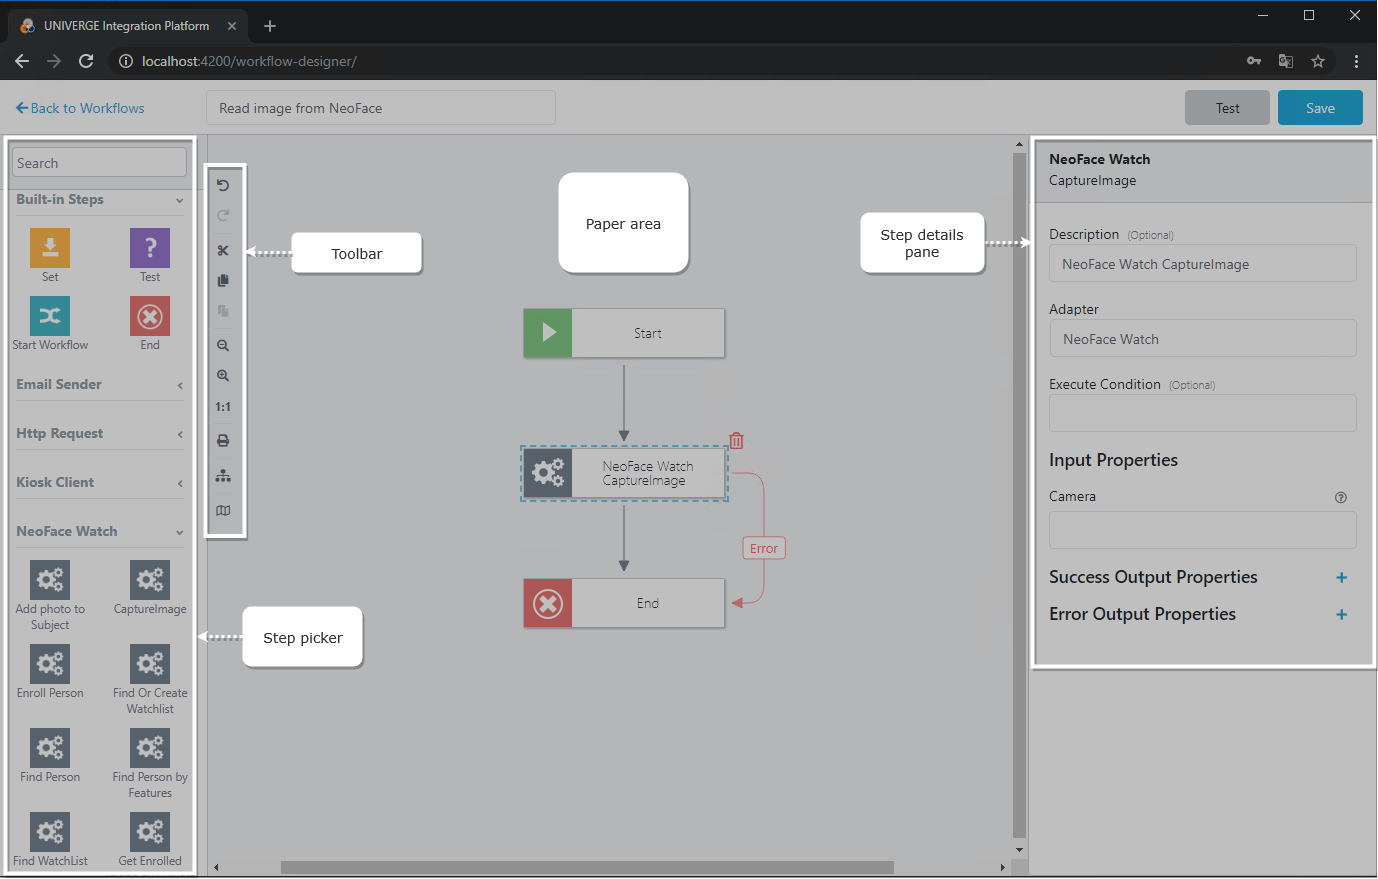
The work area in the center of the designer is called paper. On the paper there are steps. Think of a step as a task that accepts inputs, performs an action and may output results.
The steps are connected with links. The links determine what paths the workflow takes when it runs.
Some of the steps on the paper may also be configured to add or change workflow properties. These properties store data which other steps use when it's their turn to execute.
On the left, there is a step picker. The step picker shows what steps are available for you to use.
On the right, there is the step details pane. Here you can configure parameters for the selected step.
At the side, a toolbar provides various actions that make workflow editing easier, such as zooming, undo/redo, copy/paste etc.
Step Picker
The step picker always shows the built-in general steps that are supported by all workflows. These steps are followed by the command steps for which you have defined adapters, grouped by the adapter type's name.
Adapter types which do not have any commands do not appear in the picker. One example is Email Receiver adapter type.
Toolbar
The tools below are available in the designer toolbar.
| Tool | Description |
|---|---|
| Undo | Reverts the most recent change. This applies to steps, links and step attributes. |
| Redo | Re-applies the most recently reverted change. |
| Cut | Cuts the selected steps and links from the paper. |
| Copy | Copies the selected steps and links. |
| Paste | Pastes the copied steps and links on the paper. |
| Zoom In/Out | Zooms in/out the paper. To do this via mouse, press the Alt or Option key and scroll the mouse wheel up or down. |
| Actual Size | Resets the zoom level to default. |
| Prints the workflow as it appears on the paper, scaling it to fit a single A4 page. When using Chrome, the Print button shows a print preview window. In this preview window, you may adjust the scaling so that the steps take more/less space on the printed page. |
|
| Auto Layout | Re-positions the steps and links on the paper for an optimal layout. |
| Toggle Navigator | Shows or hides a navigator pane in the bottom right corner of the paper area. Clicking on it will update the position on the designer canvas according to where the user clicked. Zoom in/out can also be done by dragging the lower right corner of the scroll view. |
Note
Changes to zoom level and navigator visibility are not remembered. They are always reset when you open the Workflow Designer.
Building a Workflow
A Start step is always present on the paper. This is where your workflow starts to execute.
To build a workflow, you add steps on the paper from the step picker. Then, you connect them through links to specify the order in which they must be executed.
To add a step
- Click and drag the desired step from the step picker. Then, drop it on the paper.
To connect steps
- Click on the step to connect from. This will select the step. Depending on the step's type, one or two icons appear under the selected step. Each icon represents the type of the link that you may create from that step.
- Click and drag the icon to another step. The target step is highlighted as you hover it; when you release the mouse, a link is created.
To select step(s)
- Click on a step to select it.
- To select more than 1 step, hold down the Ctrl/Command key and click on the other steps. Click again to deselect the step. To select all steps click Ctrl+A/Command+A.
- To select steps with a selection rectangle hold down the Ctrl/Command key, on an empty part of the paper click, hold and drag the mouse to create the selection.
To drag selected steps, click on a selected step, hold and drag the mouse to move the selection to the new location.
To reroute a link
- Click and drag a link's ending arrow to begin rerouting. Drop it on another step to reroute the link to that step.
Note
Only link endpoints can be dragged. To drag overlapping links, first hover over the link that the user wants to reroute and then drag the arrow to another step.
To delete step(s)
- Click the step to delete and press the delete icon that appears. To delete multiple steps at once, select the steps and press the delete icon that appears.
To delete a link
- Hover the mouse over the link and press the delete icon that appears.
To configure a step
- Click the step you wish to configure. The step details pane is displayed, showing the step's description and other attributes.
- Make changes to the step's attributes as needed. Use either plain text, or workflow properties stored by previous steps. An autocomplete list shows what properties are available.
- Changes are automatically applied as you type them. You may use the undo/redo feature in the Toolbar if necessary.
Note
Invalid steps on the canvas have a red exclamation mark icon next to them. Hovering over the exclamation icon shows a tooltip with the validation problems. For example, next link is missing, test condition is missing in a Test step etc. Steps with non-blocking validation issues which still require your attention have an orange exclamation mark icon next to them. For example, unknown adapter name, etc.
To save the workflow
- Verify you have entered a workflow name
- Press Save button. This remembers the steps and their attributes, links and their position on the canvas.
If there are validation errors, an error message notes the invalid steps and the actual problems with those steps. You have to correct these before the workflow can be saved.
To test the workflow
You have to save a workflow before it can be tested. This ensures the workflow is valid.
- Press the Test button from the Workflow Designer's top bar. If the workflow has unsaved changes, a confirmation window will prompt you to save them.
- A Test dialog shows, where you can provide workflow properties as input for the test and see the results. See Test Workflow for more information about testing a workflow.
Keyboard and mouse commands
For an overview see Keyboard and mouse commands